Thursday, August 11, 2011

3-D Cake Collection (House Warming) - Ittybit's Kitchen

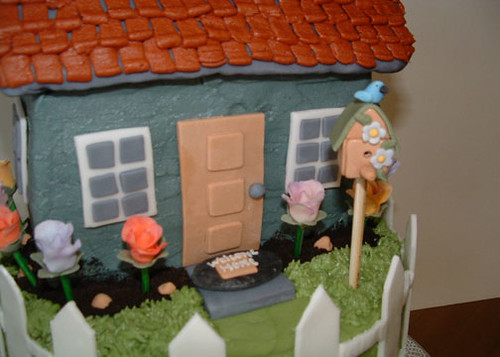
Front of house
Back view of house
Close up of the front 


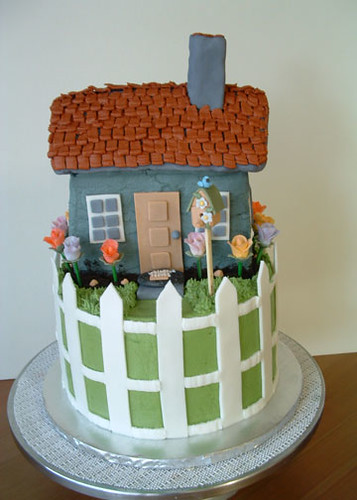
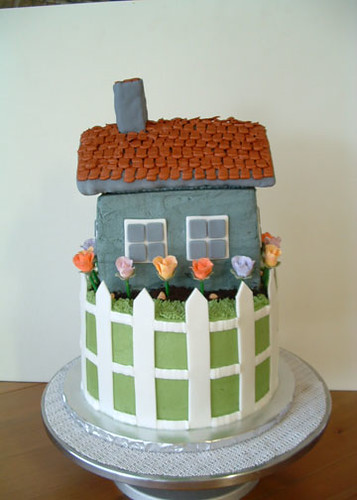
This cake was done for a house warming for a friend.  The bottom is a 2-layer chocolate cake with regular butter cream filling.   The main portion of the house is also a 2-layer chocolate cake with butter cream filling.  TIP- I did make a larger cake to accommodate for the main portion of the house and the left overs were used to create the roof. Tinted butter cream was the main ingredient that decorated this cake besides the few handcrafted fondant roses, birdhouse, fence, door, rocks, and windows.  The white fence was handcrafted using a mixture of fondant and gumpaste.  I handcrafted the birdhouse, bird, small flowers on the birdhouse, and roses a few days prior to the delivery of the cake.  I cut the front door and windows the day of decorating.   

The chimney was created using rice crispy treats.  I then covered it with gray colored fondant.  I used a mixture of red and brown to create a Terra cotta butter cream styled roof.   I used tip #46 to get the smooth square shaped look of the tile.  I used crushed oreo cookies to resemble dirt and little tiny fondant pebbles to create the rocks.   I used the standard thick dowels to attach the house to main base of the cake.

This cake looks like it would be complicated to do but it was very easy.   The only time consuming part was handcrafting the roses and the birdhouse.  

Victoria's Secret Lotion New Favorites - Body Care

                           VS Fantasies Exotics Moonlit Jasmine

 The other day while I was in Victoria Secret doing some shopping I came across these two wonderful lotions.  Moonlit Jasmine is an exotic fantasy of lush jasmine warmed by vanilla woods.  VS also describes it as "sensual days, sultry nights."  It's a very lovely scent and one of my favorites!  I did find out that Moonlit Jasmine is a limited edition.  So if this one tickles your fancy get out and buy one while supplies last. 

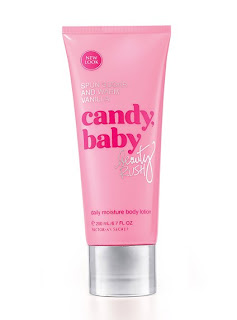
                       VS Candy Baby Daily Moisture Body Lotion


Candy Baby is an indulgent duo of spun sugar and warm vanilla.  It reminds me so much of cotton candy which I personally love to enjoy to eat whenever I have the chance to.  So I couldn't pass up on the chance to add this sweet smelling lotion to my collection as well.   This one is in stock all year long.


Mango Temptation is another wonderful smelling lotion. It's an exotic kiss of mango nectar and sexy hibiscus.  It makes you feel like you are on a tropical island without a care in the world!   This will be another addition in the future.

Tuesday, August 9, 2011

Olive Zucchini Spread Recipe - TOH

                                       Photo via Taste of Home

This sounds super yummy!!!   Click here for the recipe.

Featured Item - Vintage 1950's Red Stone Brass Locket Solid Perfume (an Etsy Shop)

                                       Front of solid perfume locket
                                          (photo via Pink Fence)

                                     Inside of solid perfume locket
                                        (photo via Pink Fence)

I really enjoy wearing jewelry especially when it's something different and original.  I really like this locket because a solid perfume can be placed in it so that you can smell pretty all day but it's hidden in this beautiful locket.  It has an antique look to it which I absolutely love and the design reminds me of the Victorian era as well.  A piece that I wanted to share with you. 

3-D Cake Collection (Curious George) - Ittybit's Kitchen


The next 3-D collection cake is Curious George.  I did this for friend for both her grandson's birthdays.  This was a pretty easy cake to make.   The bottom cake was a 12" inch square which was a white cake with banana cream filling.  This was covered with blue tinted fondant then decorated with long red rectangular shapes and balloons that I hand cut from different colored fondant. These were attached by using a little bit of water.  The hat portion was a 9" inch 2-layer cake that was shaped to look like a hat.  This was a regular white cake and the filling was regular butter cream and fresh sliced strawberries.  It was then covered with yellow fondant.  I placed two balloons and with black colored butter cream frosting I wrote both boys' names as well as "Happy Birthday."  The brim of the hat was made out of a large round cake board which was also covered with fondant.  I also used clear piping gel on the cake board to act as a glue to help the fondant stick.  I handcrafted a yellow rope to become the trim piece that would finish the hat.  The monkey head was done using the 3-D bear pan from Wilton.  I tweaked it a bit so that it would resemble a monkey face.  As for the ears I made a mixture of fondant and gumpaste then tinted it with a little brown.  Please note that the ears were done a few days in advance so they would have time to dry.   I also inserted toothpicks prior to letting them dry completely.  As for the eyes I used my round cookie cutter and cut out some black and white fondant circles.  The monkey face portion was also done using lightly brown tinted fondant and then I tinted some butter cream with dark brown to create the fur.   To create the ripping effect all I did was cut the top of the hat into the triangular shapes and insert the monkey onto the dowel.  The dowel was also screwed into the base of the plywood cake board to ensure that all the cakes wouldn't shift. 


Until my next blog...happy cake making! 
Ittybit

Friday, August 5, 2011

Featured Artist - Fallen Sparrow

                                              Fallen Sparrow
                            (all pictures supplied by Fallen Sparrow)

I came across Fallen Sparrow through the Etsy's suggested shops.  They carry some beautiful clutch purses for the bride and the bridesmaids.  They also carry gorgeous hair accessories and ring pillows. 

"If you're tired of the same old boring wedding clutches & accessories you've found the right place! Sneak a peek at the dreamy bridal clutches & formal bridesmaid clutches . The Collection is bursting with color and inspiration....Flower Clutches, Feathers Clutches & Fabulous Colors are just bursting at the seams. Or if you are the understated type....we've got you covered too."

Here's just a few of Fallen Sparrows collections...

~ Bella Bloom
~ Marie Antoinette Collection
~ Rustic Woodland Bride
~ Orchid Bloom Collection

Samples from Fallen Sparrow:

1. Rustic Chic Feather Clutch Woodland Feather Bridesmaid Clutch - Ivory Bridal Clutch - Kisslock Snap Clutch with Rosette Flowers - $45.00

2.  Eggplant Royal Purple Plum Bridesmaid Clutch or Bridal Clutch with Ivory Orchid Flower Blooms - Kisslock Snap Frame Bouquet Clutch - $45.00

3. Olive Green Citron Yellow & Teal Turquoise Bridesmaid Clutch or Bridal Clutch - Flowers Blooms - Bouquet Clutch - Kisslock Snap Petite Clutch - $45.00

4. Satin Bridal Clutch or Bridesmaid Clutch - Kisslock Snap Petite Clutch - Custom Colors - Black, Silver, Gold, Ivory, and Champagne - $45.00

5. Ivory Bridal Clutch or Ivory Bridesmaid Clutch set - Kisslock Snap Petite Bouquet Clutch - Pale Pink or Peach - $45.00

6. Red & Black Clutch - Bridal or Bridesmaid Clutch - Kisslock Snap Petite Clutch  -  Red, Black, and White - $45.00

Here's a little insight into the owner of Fallen Sparrow:

1.  Tell us a little about yourself.
My name is Sarah and I'm a hopeless artistic entrepreneur. I live in a lovely town by the sea. I love walks on the beach even in the fog. In fact I love everything about the ocean... the smell, the wind, the sand....everything!

2.  How did you become interested in creating?
I was born into an artistic family. We were always doing fantastic art projects. One of my favorite memories was pressing & drying wildflowers and then making laminated bookmarks with the blooms. My imagination has always led me into creating something fanciful and expressive.

3.  What is your inspiration?
I am inspired by many things. I'm amazed by the composition of clouds on a day after rain, by the petals of a Pansy or a Wild Indian Paint Brush. I love the geometric and sporadic patterns you find everywhere in nature. I am completely inspired by color.....thank goodness I am not color blind! I love fabric....it just calls out to be created into something fabulous and interesting. I really enjoy looking at wedding blogs for color-story inspiration. Oh yeah and I can't forget to give props to my fellow Etsian's, I am inspired and amazed by such an incredible community of fellow artist's.

4.  What is your favorite piece you’ve made and why?
Hmm.. my favorite piece? Well, really I fall in love with every new piece I create.... but I always seem to lean towards anything bright and full of color! I love my Big Bags shown on my website ( not on Etsy at the moment ). They are made in fabulous retro and modern prints with vintage jewels. Right now I'm a little obsessed with feathers. I really love the Feather & Flower Clutches because they look like little art compositions.... full of color and texture. I love pieces that you wait to use for a special occasion.
To see all of Sarah's great products check out Fallen Sparrow.

3-D Cake Collection (Elmo Cake) - Ittybit's Kitchen

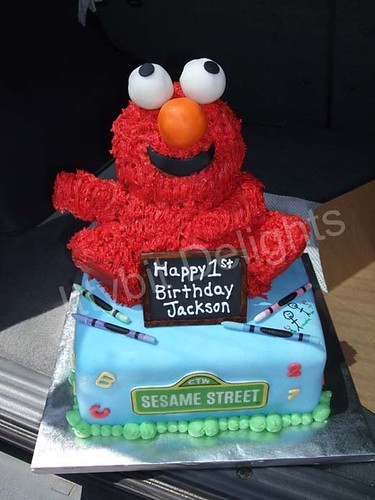
Front view of Elmo 3-D cake
Close up of handcrafted crayons
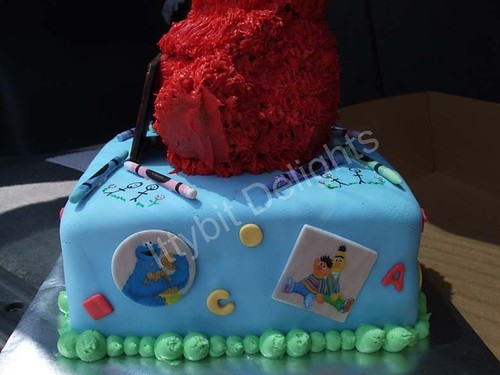
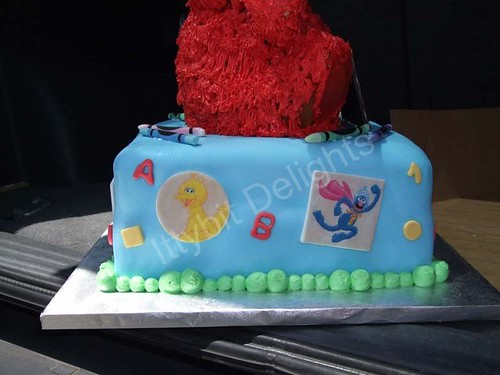
Side view shot
Sesame Street sign that was placed on the front of the cake
The next cake in my 3-D collection is the Elmo cake.  This was done for a family friend whose son was turning 1.  This cake was a little  more challenging and I will fill you in on why.  The main body of Elmo needed to be attached to the base of the square cake on which it would be sitting on.   I couldn't just use the basic thin dowels that would be used to stabilize a regular cake because they would just snap in half.  Instead I needed to buy a dowel that was about a 1/2" inch thick.  My husband helped me by sharpening one end and then screwing the other end of the dowel to the bottom of the cake board.  In this case I needed to use a piece of plywood for the base to ensure that it wouldn't flex since this cake was heavier.   Once the dowel was attached I could move on to the square cake itself.   I went ahead and did what I needed to do as far as decorations went for prepping them.  I tinted the fondant that would be covering the square cake with a light blue.  I then used my small letter cookie cutters and shapes to cut out different colored fondant pieces that would be attached to the cake later on.  Here's a tip: whenever you are attaching decorative pieces to a fondant covered cake it's better to use a little bit of water than frosting.   Take a brush and dab it in some water then brush that onto the fondant piece then apply it to the cake.  When you use frosting it's a bit more messier and it can ooze out from underneath the piece which you don't want. 

Sugar art pieces-  as you will see there were some images that I used on the sides and the front of the cake as well as the crayons.   These were very simple to do but I suggest that you create them a few days in advance as it does take  time to dry completely.   

Character images- I saved these images on my computer then I re-sized these images in Photoshop and then printed them out on to NON-EDIBLE rice paper.  Once they were printed out and cut out I applied them to circle and square shapes that I made a few days prior.  All I did was mix some fondant and gumpaste together and allowed these pieces to dry so that it would become hard.  Once these pieces had dried completely I again used my brush and little bit of water and attached the rice paper images to the different shapes.  I then allowed the piece to dry completely.  To attach these character images, instead of using the water technique, I made some royal icing.  I took a knife and just spread the royal icing on the back and stuck the shape to the cake.  

Crayola crayons-  I simply made these using the combination of fondant and gumpaste and then tinting it to the colors that I would need.  And the same way I created the rice paper characters I created the rice paper labels that wrapped around the crayons.   I used a black edible art pen and drew little stick figures near the crayons. 

Blackboard-  this was all done in fondant and gumpaste.  I mixed the two and then added black gel to get the main black board and let that dry completely.  And for the wood frame all I did was take some white fondant and then trimmed it size.  I attached those cut pieces with water to the black board and then used my fondant tool to give it that grain look.  Once that was done I took some brown gel and painted it a bit to give it that finished wood look.  I used royal icing to write the "Happy 1st Birthday Jackson." 

Elmo- he was created using the teddy mold from Wilton.   The body of the bear needed to be tweaked a bit and that was all. The ears needed to be removed and I needed to use a rice crispy treat for the arm that extended out on the side.   I used medium sized Styrofoam balls for the eyes and nose.  I cut out two small black fondant dots and attached to the eye balls. 

Another side view
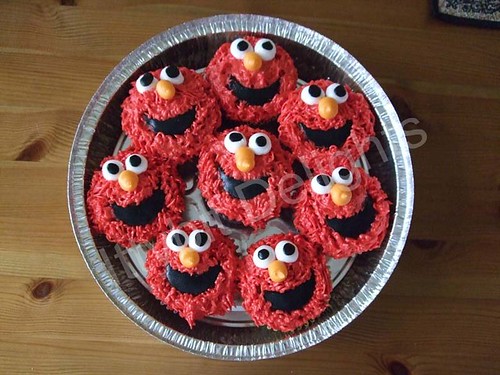
Elmo Cuppies
Before making Elmo come to life with his red fur we needed to attach him to the cake as well as to the base board which now had the large 1/2" dowel attached to it.  First the cake.  My husband and I carefully aligned the cake to make sure that it would be sitting on the cake board (which is covered with silver cake paper) correctly.   At this point the cake had been covered with the blue fondant but NOT decorated yet.   Once the square cake had been placed it was time to place Elmo.  This was a bit tricky.  Again we lined everything up to make sure he would be sitting straight.   Here's another tip: the dowel did not go all the way up to the tip of the head.  We measured prior to make sure that the dowel would go half up Elmo.  Once we knew that he would be straight and center we went ahead and placed his body on the dowel.  Beautiful!!!   Now it was time to give Elmo some fur.   I had already made some red frosting so my husband helped me out a great deal by piping Elmo's fur with the grass tip made by Wilton.  In the meantime I attached all the decorations to the main cake and once that was done I piped the decorative ball boarder with some light green butter cream frosting.  I also made a few cupcakes to go with the cake. 

Like I mentioned before...this was a project that took some time and pre-planning was involved.  But overall it was a lot of fun and my friends absolutely loved their son's cake. 

Until my next blog...happy caking!
Ittybit

Thursday, August 4, 2011

3-D Cake Collection (Dr. Dew Cake) - Ittybit's Kitchen

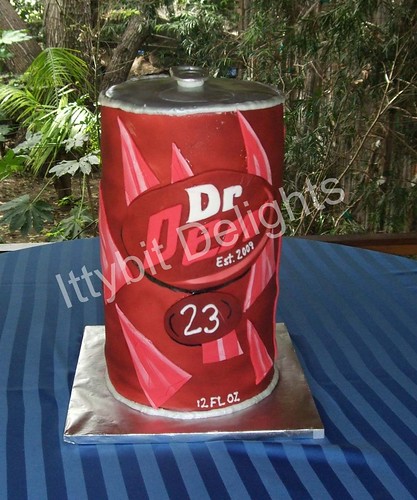
Front view of Dr. Dew Cake
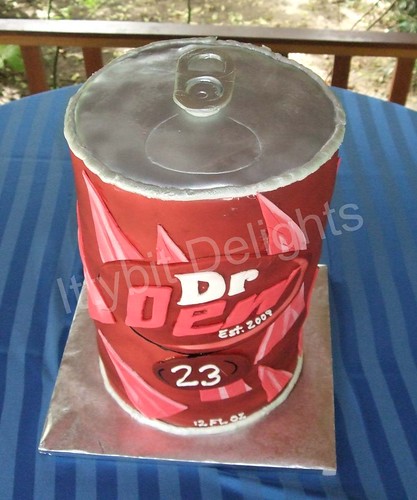
Top view
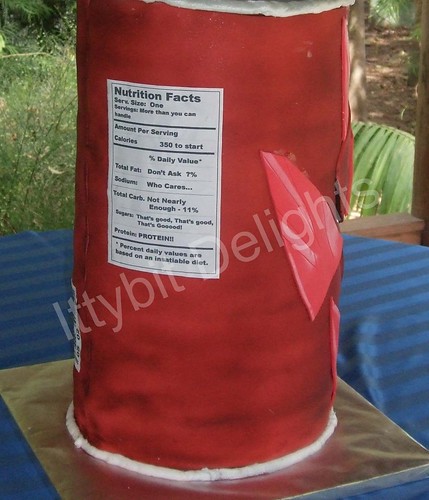
Nutrition Facts Label
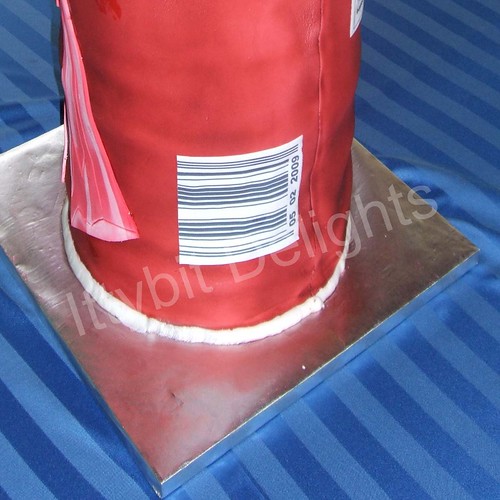
Bar Code which has wedding date on it.


So the next cake in the 3-D collection is the Dr. Dew cake. The story behind this cake is that the bride and groom liked Dr. Pepper and Mtn. Dew.  So they wanted to combine the two.  This was another fun edible creation to make.  This stood approx 16" inches tall.  I used round cakes to create this. And if my memory serves me correct this was a 5 layer cake.  The main body of the cake was wrapped in fondant and then it was airbrushed to match the color of the Dr. Pepper can but the decorations needed to reflect the Mtn. Dew can.  All decorations were made using colored fondant.  The nutrition facts and the bar code both were created using sugar paper.  The bride and groom also submitted information so that the nutrition facts could be customized for them.   The bar code also includes the date of their wedding.   I'll be honest....although this was a pretty simple cake to do covering it with fondant was a bit difficult and I needed my husband to help me roll it out and cover it.   But overall the bride and groom were very happy with it and it was definitely the talk at their wedding.

Until my next blog...happy cake making!
Ittybit

Wednesday, August 3, 2011

3-D Cake Collection (Spa Themed Cake)- Ittybit Delights Kitchen

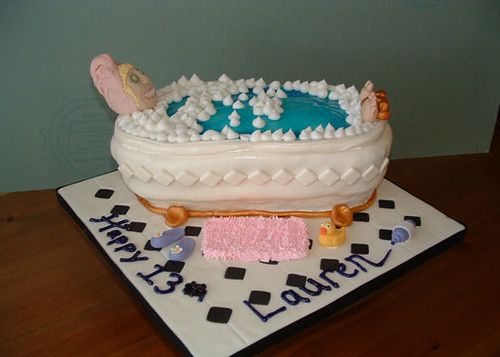
3-D Spa Themed Birthday Cake
Front View of Spa Themed Cake
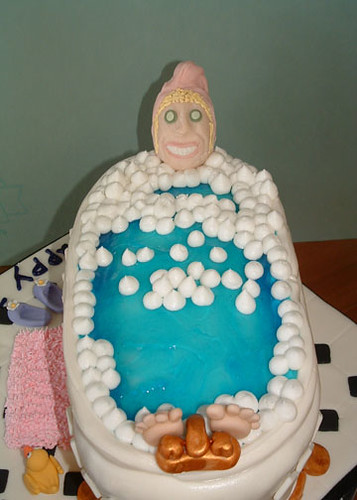
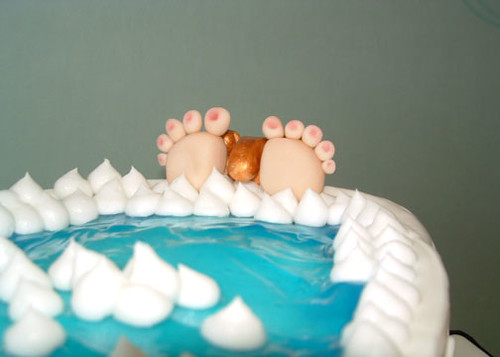
                                                 Close up of feet.

Over the next few days I will be sharing with you some of the 3-D themed cakes that I've done.  I've enjoyed designing and bringing these edible art pieces  alive.  It's always been exciting for me to be able to see the look on the faces of people when they see the finished piece.  That's truly priceless to me.   And knowing that this was created just for them.  I like thinking outside of the box and doing something different.   Something that is unexpected.  Or having someone say "you can do that with cake?"  Anything is possible with a little creativity.   I also enjoy being able to give tips to those of you who would like to experiment with something yourselves but are a little afraid on where to start.    So please...if you should have any questions don't hesitate to ask me. 

So without further ado....

This first cake is the spa themed cake.  The main body is made out of regular cake but shaped to make a bath tub.   It was a 2-layered cake.  I then frosted it so that the fondant had something to grab on to and wouldn't just fall off the cake. I used some clear piping gel and tinted that light blue to make the water and used some frosting to make the bubbles for the tub. The square pattern that you see as the border around the cake was done use regular white fondant and a small square cookie cutter.  The base around the tub, the claw feet and the water faucet all were created by shaping white fondant and being painted with gold edible luster dust.  The head, feet, rubber ducky, purple slippers and toothpaste tube were all made out of colored fondant that I tinted with Wilton gels. The little pink shag carpet was made using royal icing (which dries hard but it can still be eaten) and tinting it with a light pink.  The base board on which the tub sits was created using four pieces of cake cardboard.  To make sure these boards would not shift or move around I took some tape and placed it on each of the four sides from top to bottom.  Once these were secured I then applied some of the Wilton clear piping gel on the top of the first board to act as a glue to keep the fondant from falling off.  I then laid the white fondant on top of this.  I then made a honeycomb pattern for the floor.  I tinted some white fondant with black and rolled that out.  I used the small square cookie cutter and started to cut little black squares out.  Once I was finished with my floor pattern I took the small square cookie cutter and started to cut out square patterns from the main floor.  Once I removed the white square shapes I would replace them with the black ones that I just created.  To finish this piece of edible art I used the clear piping gel and tinted it with some purple gel colorant to write "Happy 13th Lauren."  I used black ribbon to go around the base of the cake board to dress it up a bit. 

Overall I was very happen with the finished piece.  I hope you enjoyed the "spa themed cake."

Until my next blog...happy cake making!
Ittybit

TOH - Chocolate Zucchini Cupcakes

                                       Photo via Taste of Home

I've had zucchini dessert bread and that was pretty tasty.  So now imagine zucchini and chocolate combined.   My taste buds are going crazy just thinking about.  This recipe was submitted by: Carole Fraser - North York,  ON.  I can't wait to make these myself!   Click here for the recipe
Until my next blog....happy cupcake making!
Ittybit

Pink and Black Themed Wedding Cake and Cuppies

Pink and black wedding themed cuppies.
A close up shot of 6" inch topper cake.


Close up of cuppie with handcrafted pink fondant rose.


I created this wedding topper cake and cupcakes a few years ago for my mom's wedding.  It was a pink and black themed wedding and she really loved the style of fondant roses.  So my gift to her and her husband was their wedding cake and cupcakes.  Needless to say the bride and groom were very happy with the final outcome.